By Brant, DIY Car Guy
(Quick read: 5 minutes. Or watch the full demo below!)
Noticed oil puddles under your vehicle? A rear main seal leak can lead to costly repairs, ranging from $800 to $2,000. I tested AT-205 rear main seal leak fix on my 2002 Dodge Durango, and within 72 hours, the leak was gone. For just $20.
In this post, I’ll share my full AT-205 rear main seal leak fix test and results, plus what I learned along the way.
Full video above: See the whole process, from leak spot to fix. Timestamps: 0:33 Diagnose the oil drip | 5:10 Proper Way to add AT-205 with Fresh Oil (…and how much to add!) | 10:45 72 hour Results, did it Work?
Why Rear Main Seal Leaks Are a Pain — And How AT-205 Can Help
These leaks happen at the engine-transmission junction from age or wear. Mine left spots after 12 hours parked. “This is coming off the rear of the engine… it’s the rear main seal” (video: 0:46). Is it a shop fix? That would involve a transmission drop—not worth it on a 20-year-old ride. Not for the size leak I’ve got.
I’ve got a better idea…AT-205 Reseal.
AT-205 is a clear plasticizer that reconditions rubber seals. Now I’ve never been one of those mechanic-in-a-bottle guys, but this stuff is different. “This is not a chunky stop leak…it’s perfect for rubber” (6:08). I’m not about to tell you it’s a permanent fix, but it’s a cheap and easy way for DIYers (regular guys like me) to address this problem and put off having to do a major repair for years to come.
Best part? You aren’t harming anything in your engine as long as you follow instructions. And you can save mega bucks.
Down side? It doesn’t work and you’re out the cost of a bottle of AT-205.
What You’ll Need for This DIY Leak Fix
- AT-205 Re-Seal [Amazon].
- Havoline oil, my preference (5W-30 for my Durango, 6 quarts) [Advance Auto Parts]
- Fram oil filter that fits the 4.7L engine [Amazon]
- Basic oil change stuff: oil filter pliers, funnel, & drain pan
- Parts cleaner, safety glasses & gloves [Amazon]
- Bonus: Rubber mat to protect your driveway or garage floor [Amazon]
Cost: About $20 + your oil/filter (that you’d be using anyway).
Time: 30 mins + monitoring.
Step-by-Step Guide to Fixing a Rear Main Seal Leak with AT-205
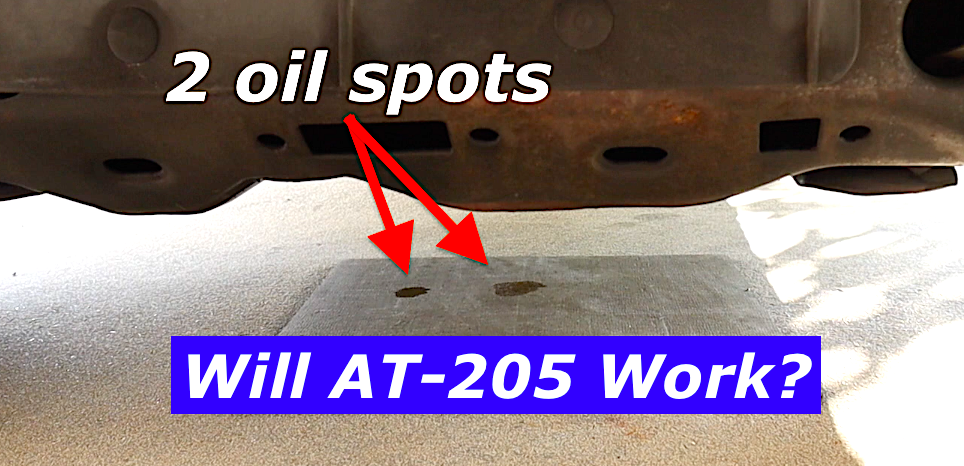
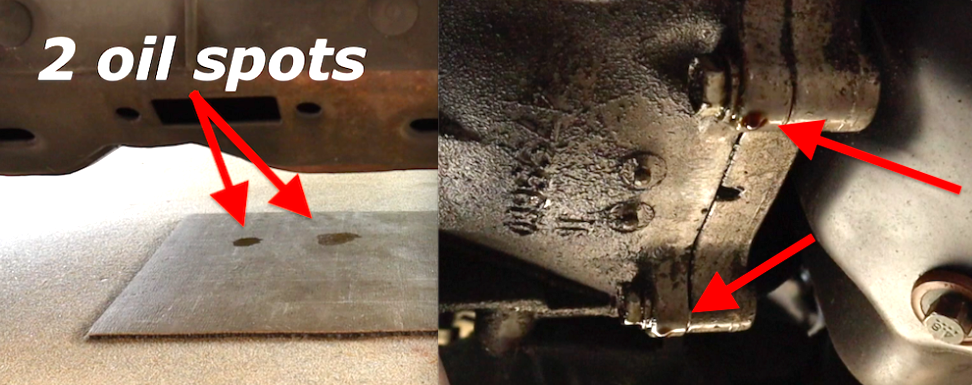
Step 1: Spot the Leak
Park on clean cardboard or a mat overnight. Check rear engine area— make sure you’re seeing black oil and not red (that would be transmission fluid). Video shows my puddles at 0:33. Yep, that’s a rear main seal leak alright.
Step 2: Do an Oil Change
Warm engine 10 mins, drain oil, swap filter. [Skip to 5:10 in the video if you’re pro at doing your oil change.] Clean the bottom of engine and bell housing with parts cleaner for post-test checks. Cleaning the area ensures you can see the impact of AT-205 clearly.
Step 3: Add AT-205 to Your Engine Oil
This is important: Pour in AT-205 mid-oil add, add the full 8 oz bottle for 6-quart capacity engine (like mine), then add the rest of your engine oil, minus 8 oz. This step is key to the DIY rear main seal leak fix.
What if your engine holds less than 6 quarts of oil? See 6:35 in the video.
I’ll break it down real quick right here. Here’s the dosage math: You’ll need 6.7 oz of AT-205 for a 5 quart capacity. And for 4 quarts? You’ll add 5.3 oz of the bottle.
Step 4: Drive, Wait, and Monitor
Idle the engine or drive for 30 minutes, park on fresh cardboard. Check the next day. Want better results quicker? Drive longer. (You’ll see best results after 5 hours total engine run time.)
Step 5: Check Your Results After 72 Hours
After 3 days and some good driving, you’ll know if the AT-205 treatment worked.
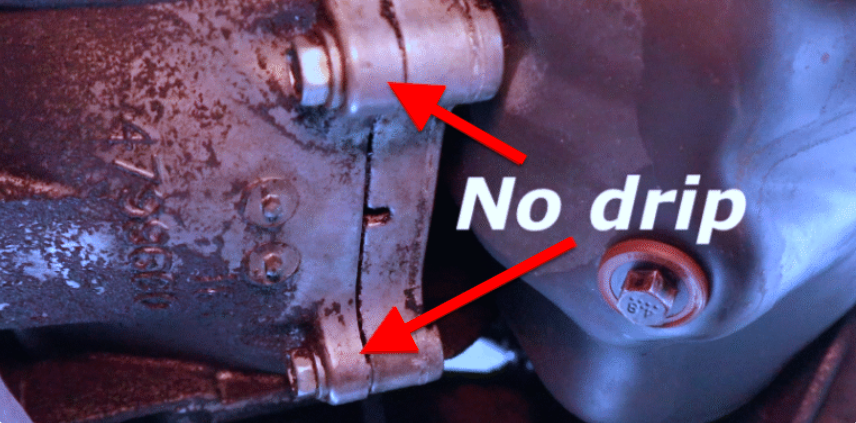
I checked every morning. By day 3, the leak was gone. This 72-hour DIY test shows how effective AT-205 rear main seal leak fix can be for minor leaks.
I had splendid results…“No dribble on the back of the engine” (11:11).
What Happened When I Tested AT-205 on My Durango
Fixed 100% after 72 hours and driving. “Honestly… it seems to have fixed it” (11:41). This DIY approach with AT-205 saved me big and I am super happy.
And here’s an update: It’s going on almost 2 years now since I shot this review footage and I am still pleased. A drip every once in a while is noticed coming off the bottom of the bell housing, but nothing at all like before. As long as I add a fresh bottle at every oil change, those drips are very few and far between.
Common Questions/FAQs About Using AT-205 on Rear Main Seal Leaks
Yes — AT-205 can fix rear main seal leaks caused by dried or hardened rubber seals. Based on my DIY test and user feedback, it works best when the leak is slow and oil drips occur after sitting, not during active driving.
Yes — AT-205 is safe for engine oil systems when used as directed. It does not thicken oil or clog passages and can also be used in transmissions, power steering systems, and differentials. Do not use it in brake systems.
Results vary, but many users see benefits lasting months or years. In my case, adding AT-205 at each oil change has kept my rear main seal leak minimal for nearly two years.
There are other stop-leak products available, but most rely on thickening agents rather than restoring rubber seals. AT-205 is unique in its approach. I plan to test alternatives like Bar’s Leak in a future comparison.
AT-205 will not work on rope-style or Teflon rear main seals, which are used in some older engines. It also won’t repair torn seals, cracked housings, or severe leaks that pour oil rapidly.
Not sure what type of rear main seal your engine has?
Just look up a replacement rear main seal for your vehicle at a parts store or online — the listing will tell you whether it’s rubber, rope, or Teflon.
Wrap-Up: My Honest Take on AT-205 Rear Main Seal Leak Fix
AT-205 saved me big. Try it on your leak—comment if it worked, I’d love to hear your story. Full oil change guide soon for the newbies (no shame!)
Ready to read my previous post? Watch me perform a DIY A/C recharge on my car. Find it here.
A little note: If you purchase anything from Amazon or Advance Auto Parts as a result of clicking on one of my links above, I earn a small commission at no extra cost to you. That means you are helping to support my family just a tad, and I am so thankful.
One last thing: Please be safe when working on your vehicle. Do so at your own risk. I’m not a professional mechanic, just a regular guy. I’m simply demonstrating how I work on my own car. Okay, I had to get that out of way, thanks again for your support!
Leave a Reply