DIY TorqueMaster Plus Spring Diagnosis (Part 1)
By Brant — DIY Home Repair Guy
⏱ Quick read: ~8 minutes · 🎥 Or watch the step-by-step video below.
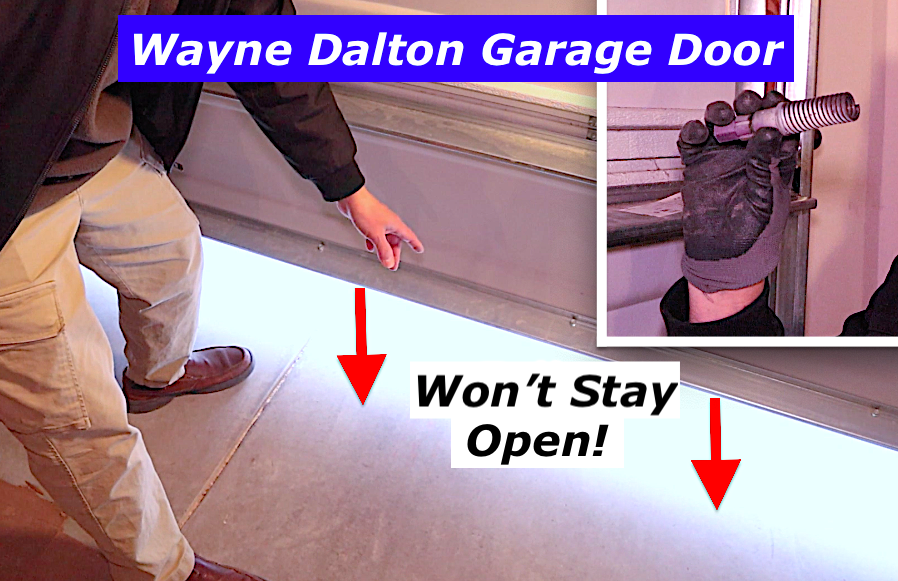
If your Wayne Dalton garage door won’t open, only lifts a foot off the ground, then slams back down, there’s a good chance you’re dealing with a failed Wayne Dalton TorqueMaster Plus spring. Today, you’ll learn how to diagnose the problem and safely remove Wayne Dalton TorqueMaster springs, DIY-style.
Unlike traditional garage doors with exposed springs, Wayne Dalton TorqueMaster systems hide the springs inside a metal tube. While this design improves safety, it also makes diagnosing spring failures a bit more confusing and frustrating for DIY homeowners.
In Part 1 of this guide, I’ll walk you through:
- How to distinguish between the newer Wayne Dalton TorqueMaster Plus system and the original TorqueMaster system
- How to diagnose a broken Wayne Dalton spring
- How to safely de-tension TorqueMaster Plus springs
- How to weigh your garage door DIY-style so you can order the exact replacement springs
- How to remove the springs correctly
This post does not cover installing or tensioning new springs — that’s covered in Part 2 to keep things safe, clear, and beginner-friendly.
⚠️ An important note: I’m not a professional garage door technician — just a DIY homeowner sharing what worked for me. I’m also not affiliated with Wayne Dalton in any way. Garage door springs can be dangerous, so take your time, follow safety steps carefully, and if you feel uncomfortable at any point, there’s no shame in calling a pro.
If you’d rather watch me in real time instead of reading, see Part 1 here on YouTube:
Common Symptoms of a Broken Wayne Dalton TorqueMaster Spring
One of the most common complaints is:
“My garage door opens a foot, then stops and goes back down.”
Other warning signs include:
- Garage door feels extremely heavy when lifted manually
- Opener strains or reverses when opening
- Door won’t stay open
- You hear a loud bang (spring failure inside the tube)
Because TorqueMaster springs are hidden, you can’t visually confirm a break like you can with traditional torsion springs — diagnosis requires testing.
How to Tell If a Wayne Dalton TorqueMaster Spring Is Broken
Step 1 – Identify Your TorqueMaster System
Before doing anything else, confirm what you’re working on.
- Most enclosed spring systems are Wayne Dalton
- Check the manufacturer sticker on the door
- Installation date matters:
- Pre-2007 → TorqueMaster Original
- 2007+ → TorqueMaster Plus
Another way to tell… TorqueMaster Plus systems use a ratcheting mechanism, not a numbered winding dial.
This guide is specific to TorqueMaster Plus, but TorqueMaster Original owners may still find parts of this guide helpful.
Step 2 – Check Spring Tension Using a Ratchet
Using a 3/8” ratchet with a 5/8” six-point socket:
- Left side winds clockwise
- Right side winds counterclockwise
If one side spins freely with no resistance, that spring is broken — even if the cables still appear tight.
🔎 Need a good/economical six point socket set? Have a look here.
Step 3 – The “Heavy Door” Test
Disconnect the opener and attempt to lift the door manually.
A properly tensioned door should lift easily.
If the door feels like dead weight, you have a failed spring.
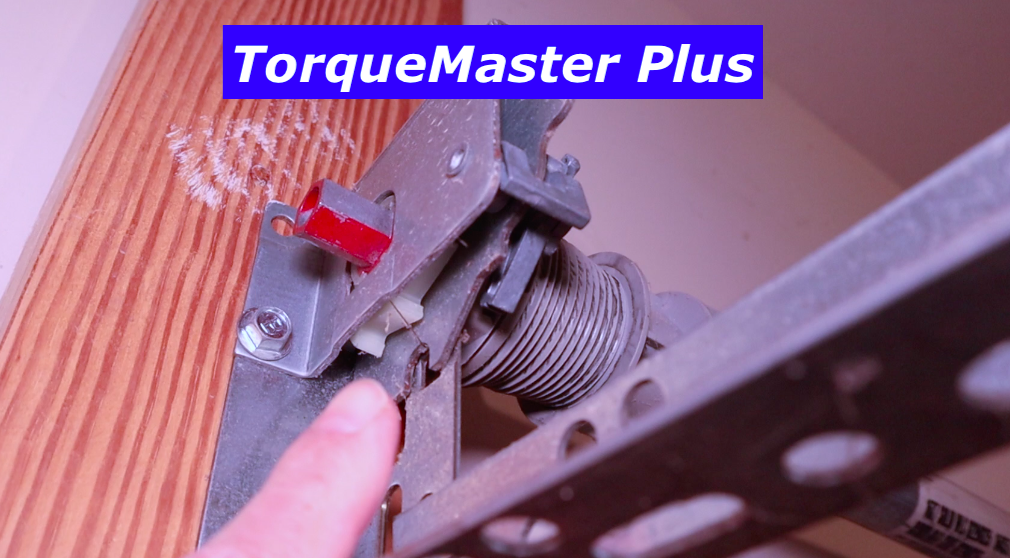
How to Safely De-Tension Wayne Dalton TorqueMaster Plus Springs
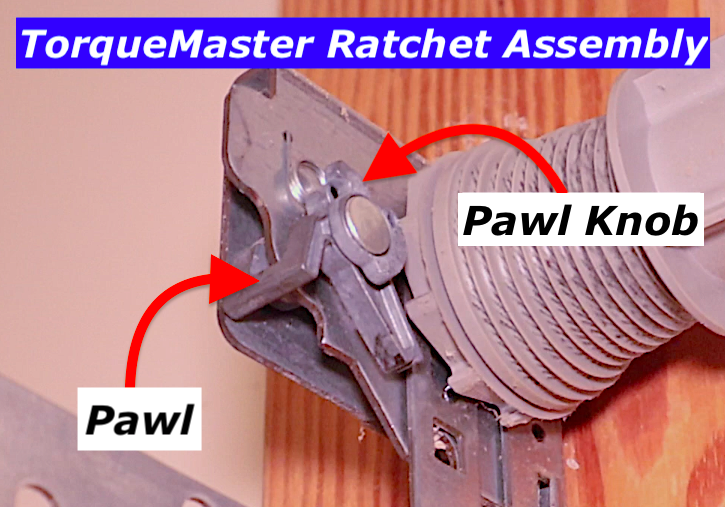
Before de-tensioning the TorqueMaster Plus spring, it’s critical to understand the difference between the pawl and the pawl knob, as confusing the two can prevent the ratchet assembly from releasing tension safely.
This is the most dangerous part of the job. You’ll be releasing tension from the remaining intact spring. [You’ll gain valuable context here if watch my YouTube video at timestamp 6:06]
Key safety rules:
- Wear safety glasses
- Keep fingers away from cables and drums
- Control the ratchet/socket wrench at all times
- Do not be in a rush here
Using the ratchet with 5/8″ six point socket:
- After confirming the pawl knob is in the up position, pull down to take tension off the pawl
- Press the pawl to disengage the ratchet wheel and hold
- Allow the spring to unwind partially, then release the pawl
- Pull back down slightly until you hear a click
- Reposition the ratchet/socket wrench and repeat until all tension is released
When finished:
- Ratchet should feel loose
- Cables should be slack on both sides of the door
How to Weigh a Garage Door After Spring De-Tensioning (DIY, No Helper Needed)
Wayne Dalton springs are engineered to precise door weight. Once all spring tension has been fully released — but before removing the springs — you can safely weigh the door to determine the exact replacement springs you need.
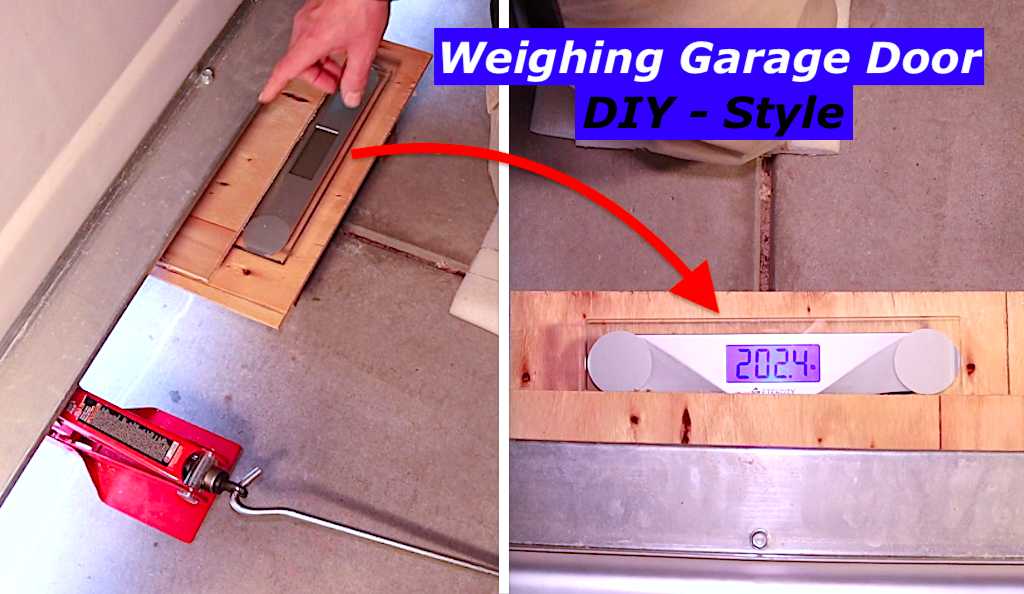
What You’ll Need:
- Bathroom scale
- Analog scale (better choice)
- Ratchet straps
- Scissor jack
- Scrap wood
[Above and below are Amazon affiliate links, which help support my website at no additional cost to you, thank you!]
Key Tips:
- Ensure all spring tension is released
- Lift door evenly using ratchet straps, then slide scissor jack underneath
- Take multiple readings if using a digital scale like me
- Use the highest reading
My 7-foot door weighed 202 lbs, which directly determined the springs I ordered.
💡 Note: Some DIYers choose to weigh the door after fully removing the springs — which is fine, either method works.
How to Remove Wayne Dalton TorqueMaster Springs
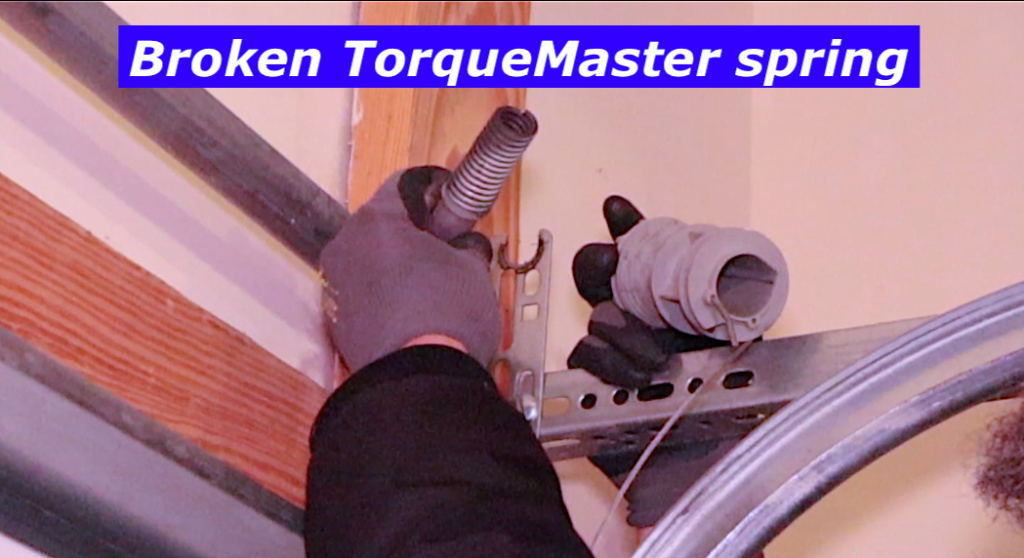
Once all spring tension has been released, and the garage door has been weighed, you can proceed with removing the TorqueMaster tube and springs.
Once tension is fully released:
- Remove both end brackets and cable drums
- Remove the center support bracket
- Lower the tube carefully while keeping it level
- Slide the springs out of the tube
You’ll often find:
- One intact spring
- One broken spring
- Plastic liners– sometimes they’ll “stick” in the tube, which you can work around (see timestamp 23:22 in video)
How to Order the Correct Wayne Dalton TorqueMaster Springs
With the springs removed and the door properly weighed, ordering the correct Wayne Dalton TorqueMaster replacement springs becomes straightforward.
To order correctly, you need to know:
- TorqueMaster type (Plus vs Original)
- Exact door weight
- Door height
⚠️ Do NOT rely solely on the sticker on the spring housing tube — tubes are sometimes reused from prior repair jobs making the sticker no longer representative of your door.
✅ Order your Wayne Dalton Torquemaster Plus replacement springs here.
🔧 DIY Tip:
When ordering replacement springs, always replace both — TorqueMaster systems are designed to work as a matched pair.
⚠️ Common DIY Mistakes When Working on Wayne Dalton TorqueMaster Springs
Even careful DIY homeowners can run into trouble with TorqueMaster systems. Here are the most common mistakes to avoid:
❌ Not fully releasing spring tension before working
TorqueMaster springs store significant energy inside the tube. Failing to fully de-tension the system before loosening brackets or drums can cause sudden movement and serious injury.
❌ Confusing the pawl with the pawl knob
This is one of the most common and dangerous errors. Pressing the wrong component can prevent the ratchet from releasing correctly or cause it to slip unexpectedly.
❌ Relying on spring housing stickers alone
Stickers on TorqueMaster tubes are sometimes incorrect due to prior repairs or reused components. Always confirm door weight and system type before ordering springs.
❌ Guessing the door weight instead of measuring
TorqueMaster springs are engineered to precise door weights. Guessing can lead to a door that won’t stay open, slams shut, or damages the opener.
❌ Replacing only one spring
TorqueMaster springs are engineered as a matched pair. Replacing only one often causes imbalance, uneven lift, or premature failure of the new spring. [see DASMA Safety Tips for Garage Door Systems]
Frequently Asked Questions
A Wayne Dalton TorqueMaster spring is likely broken if your garage door only opens a foot or two, feels extremely heavy when lifted manually, or won’t stay open. Because TorqueMaster springs are hidden inside a metal tube, you usually can’t see a break. Instead, diagnosis involves checking spring tension and performing a manual “heavy door” test after disconnecting the opener.
Yes — but only if you follow the correct steps and safety precautions. De-tensioning Wayne Dalton TorqueMaster Plus springs requires understanding the ratchet mechanism, including the difference between the pawl and the pawl knob. This is the most dangerous part of the job, so take your time, wear eye protection, and never rush the process. If anything feels unclear or unsafe, it’s best to stop and call a professional.
To remove Wayne Dalton TorqueMaster springs, the system must first be fully de-tensioned so the cables are slack and the door can be handled safely. After the door is weighed for ordering purposes, the end brackets, cable drums, and center support bracket can be removed. The tube can then be carefully lowered so the springs slide out, allowing you to confirm spring failure and order the correct replacements.
Yes. Wayne Dalton TorqueMaster springs are engineered to precise door weights. Guessing or relying solely on stickers can result in a door that won’t stay open, closes too fast, or strains the opener. Weighing the door after safely releasing spring tension ensures you order the correct springs for safe and proper operation.
Yes. TorqueMaster springs are designed to work together as a matched set. Replacing both ensures proper balance and avoids having to repeat the repair later.
What’s Next – Installing & Tensioning the Springs (Part 2)
At this point, you’ve done the hardest and most critical work.
You now know how to:
✔ Diagnose a broken Wayne Dalton TorqueMaster spring
✔ Safely de-tension the system
✔ Weigh your garage door accurately
✔ Remove the springs and tube
✔ Order the correct replacement springs
That foundation is what makes the next step safe and successful.
In Part 2, I’ll walk you through:
- How to install new Wayne Dalton TorqueMaster springs
- How to tension them correctly
- How to fine-tune door balance so it stays open and doesn’t strain the opener
👉 Continue to Part 2: Installing & Tensioning Wayne Dalton TorqueMaster Springs
If you prefer to follow along visually, you can also watch the full step-by-step process on YouTube.
God bless,
Brant
If you have a question, ran into an issue, or successfully completed the repair, leave a comment below — I read every one.
Affiliate disclosure: If you purchase anything from Amazon using links in this post, I may earn a small commission at no extra cost to you. That support helps my family and keeps this site going, and I truly appreciate it.
Leave a Reply