How to Install and Properly Tension TorqueMaster Plus Springs Safely (DIY Guide – Part 2)
By Brant — DIY Home Repair Guy
⏱ Moderate read: ~10 minutes · 🎥 Or watch the step-by-step video below.
What This Post Covers (and What It Doesn’t)
This is Part 2 of my complete DIY Wayne Dalton garage door repair series, focused on Wayne Dalton TorqueMaster Plus spring installation and proper tensioning.
If your garage door stopped opening due to a broken spring, you’re in the right place.
In Part 1 of this series, I covered:
- How to identify which TorqueMaster system you have
- How to diagnose a broken spring
- How to safely de-tension the system and remove the old Wayne Dalton TorqueMaster springs
- How to order the correct replacements
👉 If you haven’t read Part 1 yet, stop here and read it first.
This guide assumes your old springs have already been removed.
In this Part 2 DIY guide, I’ll walk you through:
- Installing new TorqueMaster Plus springs
- Reinstalling the tube and cable drums
- Properly tensioning the springs
- Testing, fine-tuning, and lubricating the door
📺 The full Part 2 video is embedded below so you can follow along step-by-step and see exactly how everything is done.
▶️ Watch: Wayne Dalton TorqueMaster Plus Spring Installation (Part 2)
⚠️ Important Safety Note (Please Read)
I’m not a professional garage door technician — just a homeowner sharing what worked for me on my own door. I’m also not affiliated with Wayne Dalton in any way.
Garage door springs store a significant amount of energy. While the TorqueMaster system is safer than exposed torsion springs, serious injury is still possible if steps are rushed or skipped.
If at any point you feel unsure or uncomfortable, stop and call a professional. There’s no shame in that — your safety matters more than finishing a DIY repair.
🔧 If you’ve already completed Part 1 and have the correct replacement springs in hand, this process is very manageable with basic tools and patience.
Step 1: Identify Left-Hand vs Right-Hand Springs
Before installing anything, you need to confirm which spring goes on which side.
Look closely at the end of each spring. The easiest way to avoid a costly mistake is to confirm the stamped markings before installation.
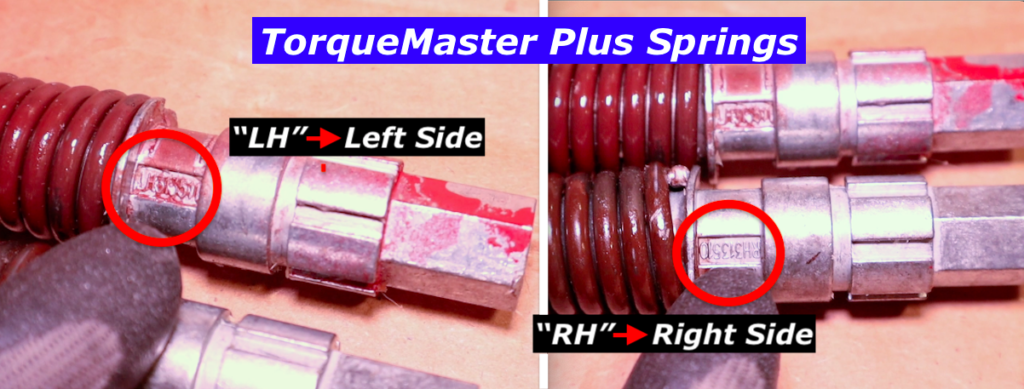
- LH = Left-hand spring
- RH = Right-hand spring
This is based on standing inside the garage, facing outward.
Some springs are color-coded (often red for left), but the stamped LH/RH marking shown above is the most reliable.
Step 2: Insert the New Springs into the TorqueMaster Tube
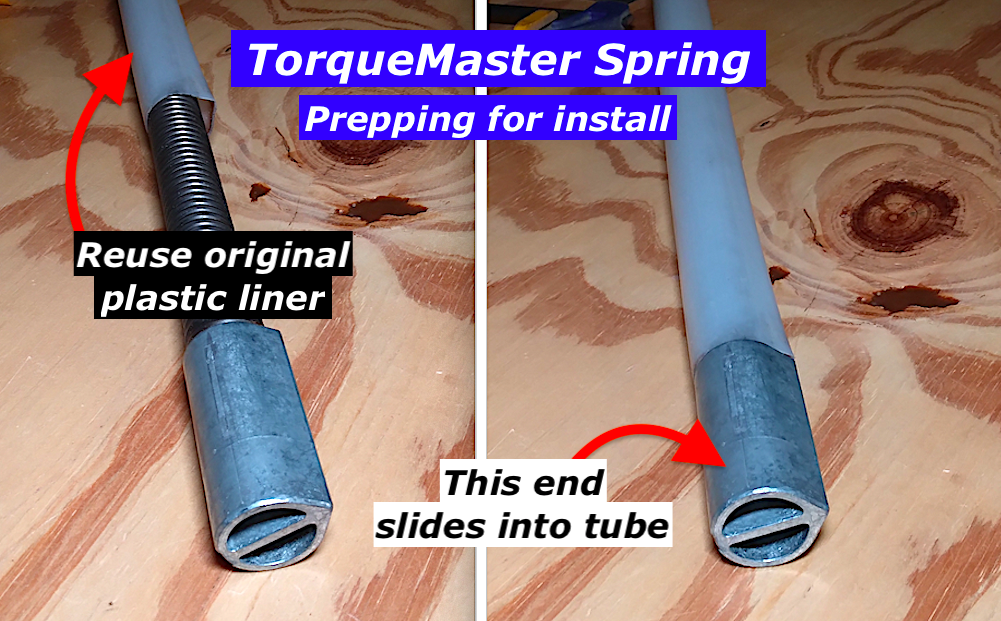
Before installing the springs, there’s one important detail to cover first:
The replacement springs do NOT come with new plastic liners.
You must reuse the original plastic liners from your old springs.
Slide the plastic liner over each new spring before inserting it into the tube.
Next, lay the TorqueMaster tube on the floor and install each spring from the correct side.
Key things to know:
- The spring end and the tube are both teardrop-shaped
- They only fit one way, like a key in a slot
- If it doesn’t slide in easily, rotate slightly — don’t force it
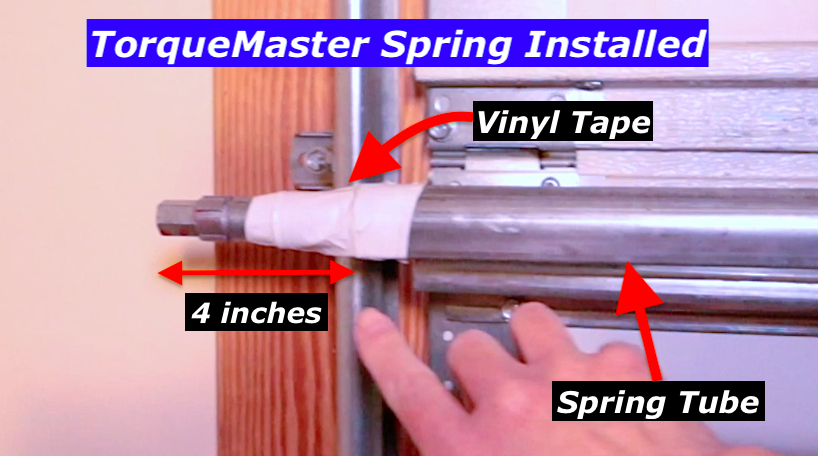
Once each spring is partially inserted (leave about 4 inches sticking out):
- Use vinyl or electrical tape to keep it from sliding around
- Avoid clamping the spring directly with pliers or vice grips (this can deform it)
🔧 DIY Tip:
If a spring doesn’t slide smoothly into the tube, stop and pull it back out. Don’t force it — something may be blocking the tube.
What to Do If a Plastic Spring Liner Is Stuck in the Tube
During the removal of my old springs, one of the plastic liners remained stuck inside the TorqueMaster tube (see Part 1 at timestamp 23:22).
This is actually a fairly common situation, and it may happen during your repair as well.
Here’s the issue:
If a liner is stuck inside the tube, you won’t be able to install the new spring in the usual way. The stationary cone end of the spring will not slide through the liner because its diameter is too large.
Fortunately, there’s an easy workaround.
The Fix
Instead of fighting it, insert both springs from the same end of the TorqueMaster tube (the opposite side). This allows both stationary cones to seat properly without removing the stuck plastic liner.
▶️ Video note: I explain and demonstrate this exact situation in the Part 2 video above at timestamp 03:50.
With the new springs installed inside the spring tube, the next step is setting the tube assembly back into position above the garage door.
Step 3: Reinstall the TorqueMaster Tube Above the Garage Door
With both springs installed inside the tube, it’s time to lift the entire assembly back into position above the garage door.
⚠️ Caution: The tube is heavier now with the springs installed. Keep it balanced, move slowly, and don’t rush this step.
Follow these actions in order:
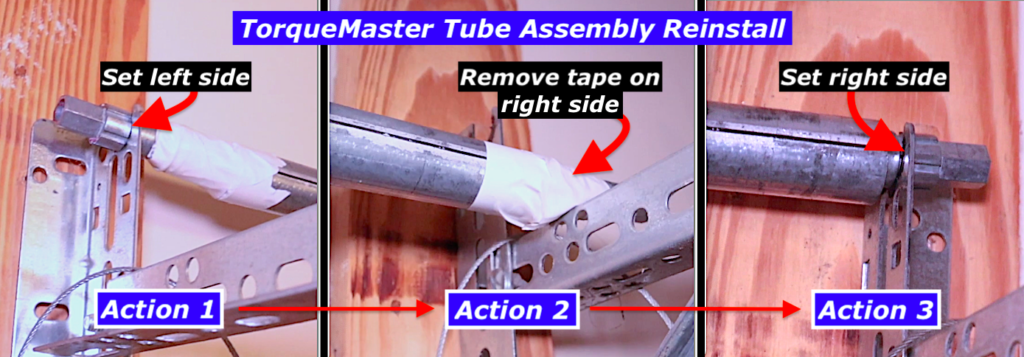
Action 1 → Set the groove on the end of the left spring’s winding shaft into the U-shaped bracket above the left side of the door.
Action 2 → Rest the right end of the tube on top of the right-side track, then remove the temporary vinyl tape from that end.
Action 3 → Adjust the right spring as needed so the groove on the spring’s winding shaft seats fully into the U-shaped bracket on the right side.
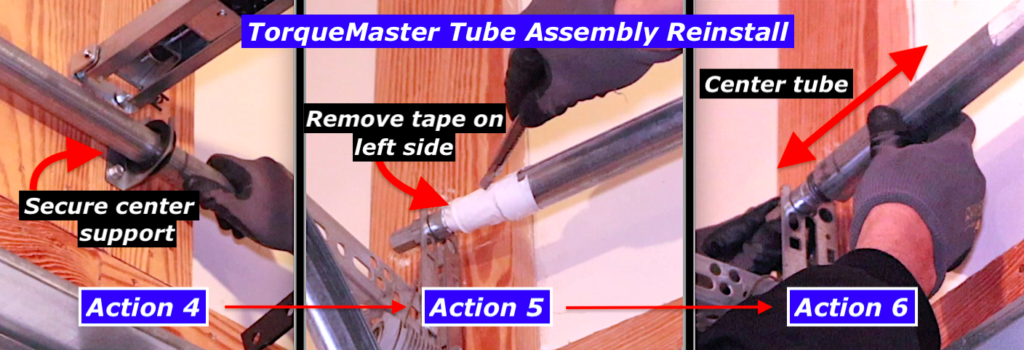
Action 4 → Secure the center support bracket to hold the tube assembly in place.
Action 5 → Remove the temporary vinyl tape from the left end of the tube.
Action 6 → Center the tube so that an equal amount of each spring is visible at both ends.
Step 4: Lubricate and Install the Cable Drums
Before installing the cable drums, lightly lubricate the bearing on the end of each drum.
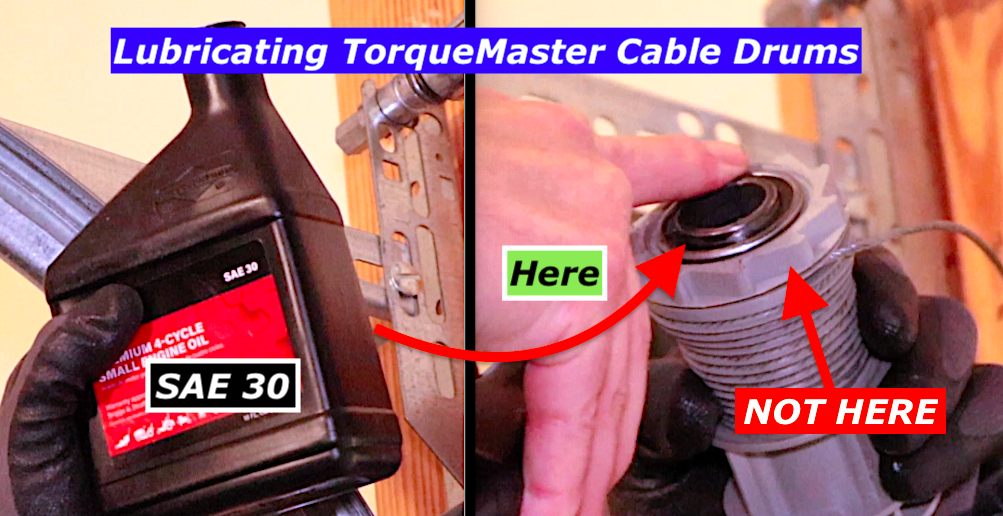
You can use:
- SAE 30 oil, or
- White lithium grease
Apply a small amount only to the bearing — wipe off excess.
Do not get lubricant on the ratchet teeth or cable grooves.
Once lubricated, install each cable drum as follows:
- Lift the end of the spring tube slightly up and out of the U-shaped bracket
- Rotate the cable drum to take up slack in the lift cable
- Confirm the cable runs cleanly from the drum to the bottom of the garage door with no twists or obstructions (this is also a good time to inspect cable for fraying)
- Align the teardrop-shaped opening and slide the drum over the winding shaft and onto the tube — be careful not to push the spring back into the tube (see timestamp 11:07 in video)
- Lower the winding shaft groove back into the U-shaped bracket Take up remaining cable slack by rotating the tube assembly
- Clamp the tube with vice grips to hold tension temporarily
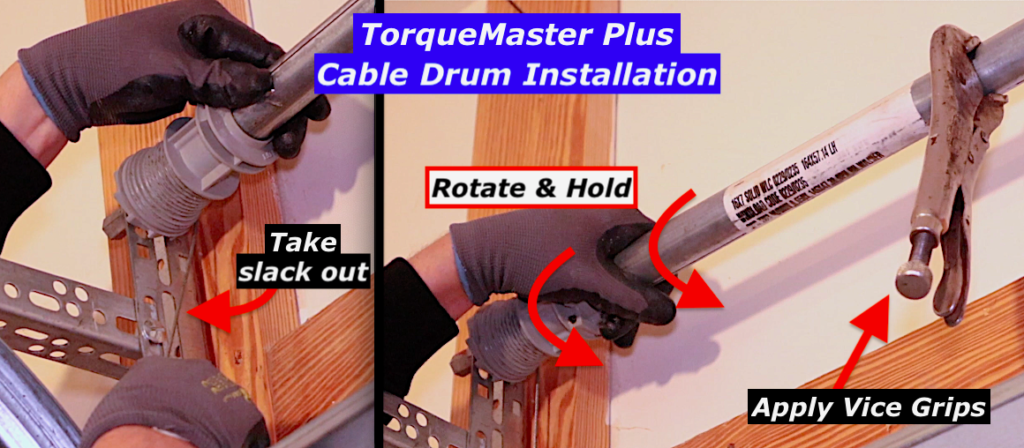
At this point, the cable drum should be fully seated, the cable tight in the grooves and running straight down to the bottom of the door.
🧩 Assembly Tip:
Complete one side at a time.
After installing the cable drum on the first side, install the end bracket (Step 5) before moving to the other side.
This supports the tube assembly and prevents it from shifting.
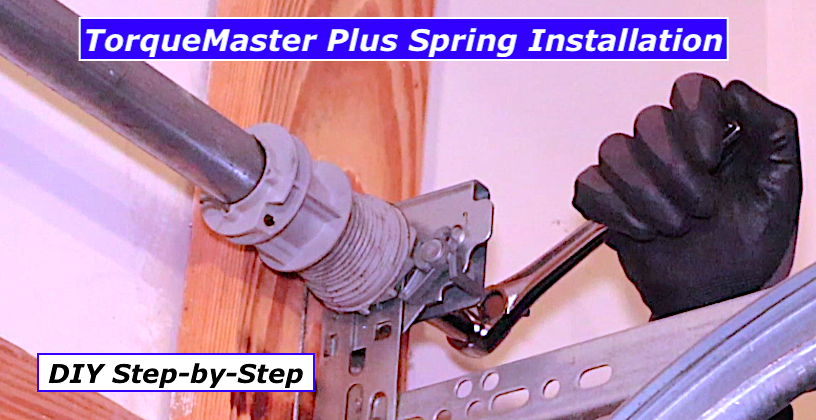
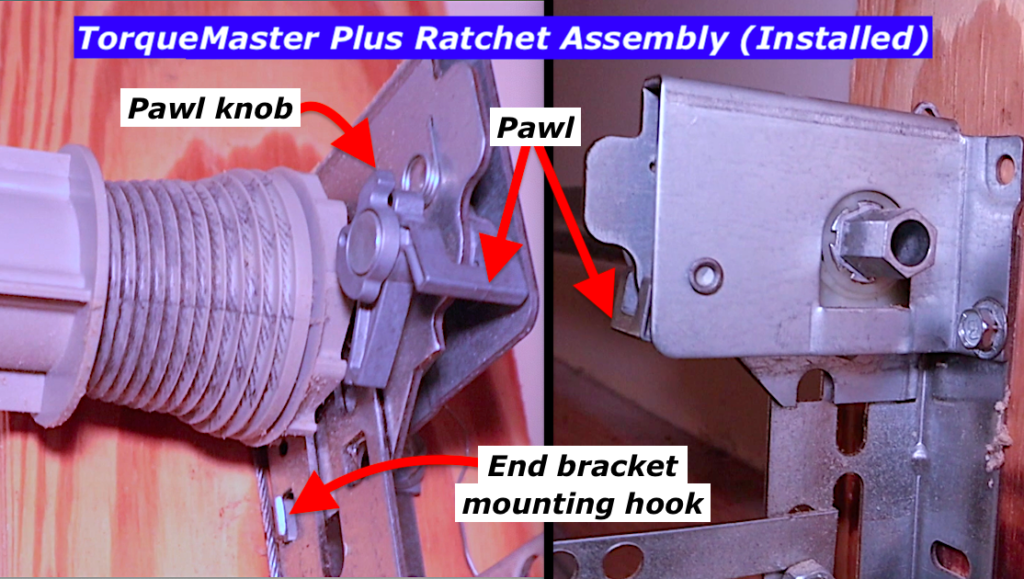
Step 5: Assemble the TorqueMaster Plus Ratchet End Brackets
Before installing the end brackets, it’s critical that the ratchet wheel is oriented correctly for each side of the door (as seen in timestamp 12:34 in video).
👉 Left and right sides are mirrored — installing the ratchet wheel backward will prevent proper tensioning.
Ratchet wheel orientation by side:

Once the ratchet wheel is correctly oriented, install the end bracket in the following order:
- Flip the pawl knob DOWN to allow the ratchet wheel to rotate freely
- Slide the end bracket and ratchet assembly over the winding shaft
- As the assembly nears the cable drum, pull the pawl up briefly to clear the drum teeth, then release it
- Seat the end bracket hook fully, then tighten the lag bolt securely into the garage door frame
- Flip the pawl knob back in the UP position
Repeat this process on the opposite side.
With the ratchet assemblies installed, it’s time to tension the springs — starting with how many turns your door needs.
Step 6: How Many Turns Do TorqueMaster Plus Springs Need?
This is the part everyone worries about — but it’s straightforward.
TorqueMaster Plus Spring Installation — Setting the Correct Tension
Base Spring Turns by Door Height
| Door Height | Turns Per Spring |
|---|---|
| 6’6” | 15 turns |
| 7’ (most common) | 16 turns |
| 7’6” | 17 turns |
| 8’ | 18 turns |
👉 Both springs get the same number of turns, even if one is longer.
For in-between heights:
- Add or subtract ½ turn
🔧 DIY Tip:
Put a strip of white tape on your 5/8″ socket so you can easily count each full rotation while winding.
Step 7: Safely Wind the TorqueMaster Plus Springs
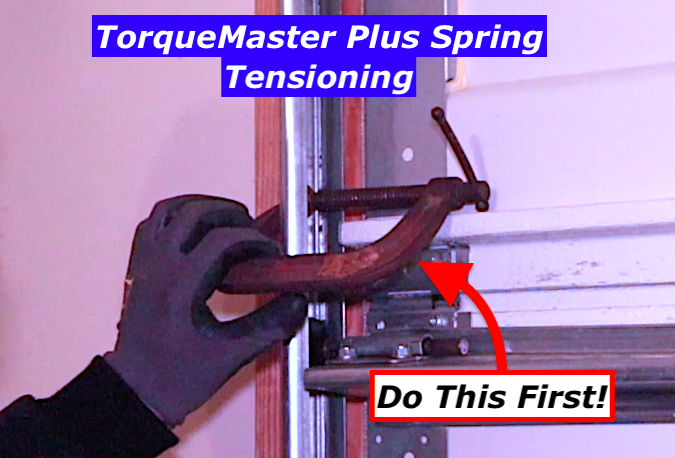
👉 To see me tension my new springs in real time, see timestamp 19:59 in the video.
Before winding:
- Ensure that you’re using a 6 point 5/8″ socket with your ratchet
- Clamp the door track with a C-clamp or locking pliers
(This prevents the door from rising as tension is applied.)
🔎 Need a good/economical six point socket set? Have a look here. [Amazon affiliate link]
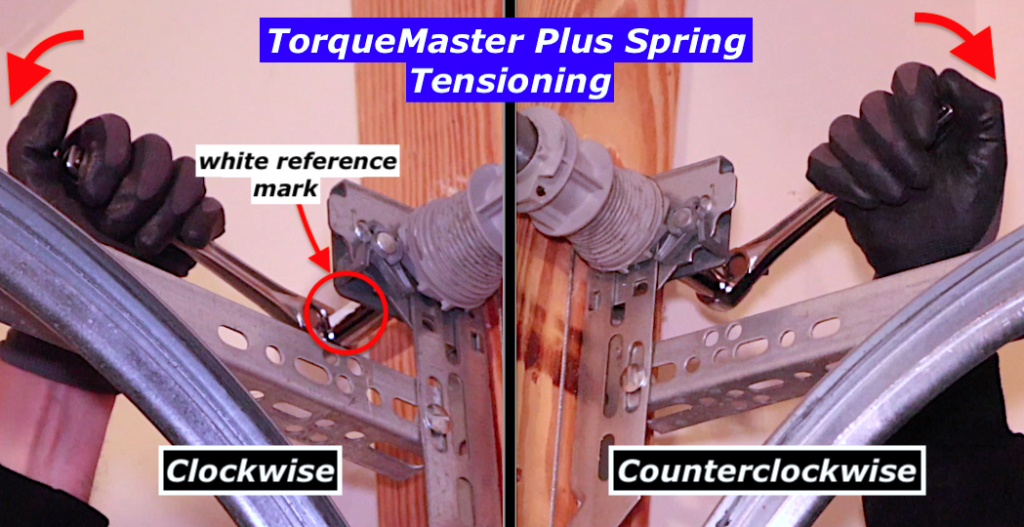
While winding:
- Wear safety glasses
- Keep fingers and hands clear of the cables
- Count each turn carefully
- Left side winds clockwise
- Right side winds counterclockwise
⚠️ Important: After winding each side:
- Flip the pawl knob down to re-engage the safety mechanism
Step 8: Test Garage Door Balance (This Matters)
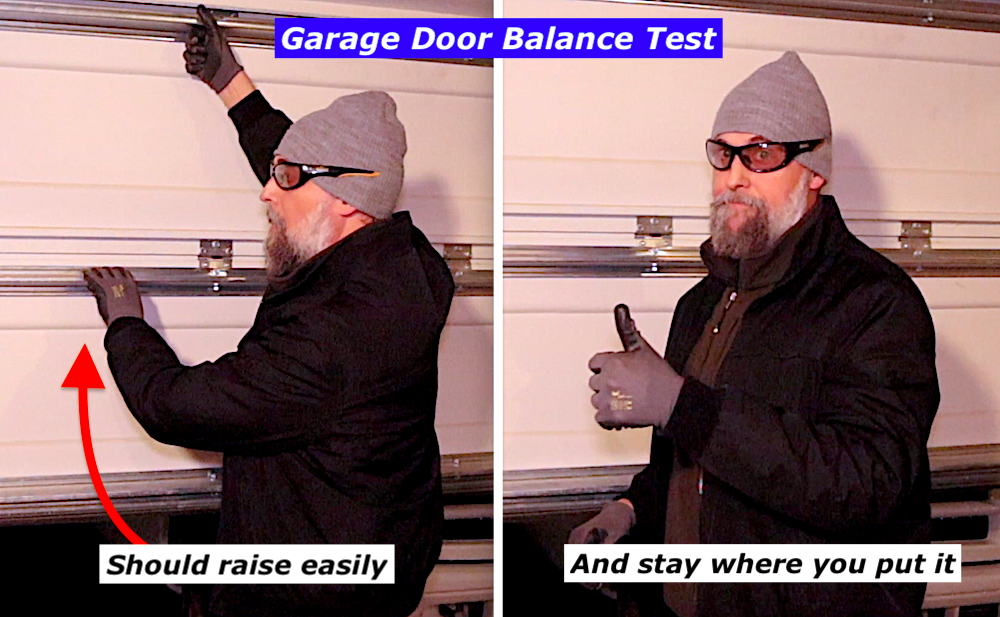
With the springs properly tensioned, it’s time to check the door balance.
To test balance:
- Remove the clamp from the track
- Lift the door manually
A properly balanced garage door should:
- Lift easily
- Stay in place when opened halfway
- Rest fully closed at the floor
If the door behavior is off:
- Door falls down → add tension
- Door keeps rising → reduce tension
Make adjustments in ½-turn increments, and always adjust both sides equally.
⚠️ Caution:
Do not wind the springs more than 2 additional full turns beyond the values listed in the table when making balance adjustments.
Once the door is balanced, reconnect the garage door opener and perform a full open-and-close test.
Step 9: Final Lubrication (Don’t Skip This)

Once the door is balanced and operating smoothly, apply lubrication to reduce wear and noise.
Lubricate the following:
- Rollers
- Hinges
- Opener chain and rail
White lithium grease works best for garage door hardware.
🔎 What I’m using here is DuPont Teflon White Lithium Grease [Amazon affiliate link]
Proper lubrication helps:
- Smooth, even garage door operation
- Reduce opener strain
- Minimize noise
- Extend the life of your new TorqueMaster Plus springs
Final Thoughts: Is This Process Really DIY?
Yes — if you take your time and follow these steps carefully.
The most important factors for a successful TorqueMaster Plus spring installation are:
- Obtaining the correct springs for your specific door (Part 1 of this series)
- Understanding the orientation of the springs (left vs right)
- Careful assembly of components
- Accurate, balanced tensioning
By working methodically and double-checking each step, I was able to complete this repair myself and save a significant amount of money. The door now opens smoothly, stays balanced, and operates quietly.
If you’re patient, detail-oriented, and comfortable using basic tools, TorqueMaster Plus spring installation is absolutely achievable for a capable DIYer.
Take your time, respect the system, and don’t rush the tensioning — that’s the difference between frustration and a smooth-running door.
⚠️ Common DIY Mistakes to Avoid During TorqueMaster Plus Spring Installation
These are the most common TorqueMaster Plus spring installation mistakes — avoid these, and you’ll avoid 90% of DIY problems.
❌ Not measuring door height before tensioning
TorqueMaster Plus springs are tensioned based on door height, not guesswork.
- Too few turns → door feels heavy
- Too many turns → door rises on its own
Always confirm your door height before winding, and follow the turn chart above exactly.
❌ Forgetting to reuse the plastic spring liners
This one is easy to miss — and easy to regret.
Wayne Dalton TorqueMaster Plus springs use plastic liners inside the tube to:
- Reduce friction
- Minimize noise
- Prevent metal-on-metal wear
👉 Always remove the plastic liners from the old springs and reuse them when installing the new TorqueMaster Plus springs.
❌ Installing both cable drums before securing one side
It feels faster — but it makes the job harder.
Installing the end bracket after completing one side at a time:
- Stabilizes the tube
- Prevents shifting
- Keeps cable tension consistent
Finish one side completely before moving to the other.
❌ Misorienting the ratchet wheel
This one causes instant frustration.
If the ratchet wheel is flipped around in the end bracket:
- The spring won’t tension
- The ratchet won’t hold
- You’ll think something is broken
Double-check left vs right orientation before securing the end brackets.
❌ Forgetting to clamp the door before winding
This is one of the most dangerous mistakes.
If the track isn’t clamped:
- The door can lift unexpectedly
- Cables can lose tension
- Fingers can get caught
Always clamp the track with vice grips or a C-clamp before winding springs.
❌ Losing track of spring turns
Half-turn errors matter.
Common causes:
- No visual reference on the socket
- Counting while repositioning the ratchet
- Switching sides mid-count
🔧 DIY Tip:
Put a white mark on your 5/8″ socket so you can easily count each full rotation while winding.
❌ Adjusting only one spring during balance testing
TorqueMaster Plus systems rely on balanced tension.
If you:
- Add tension to one side only
- Remove turns unevenly
…the door will bind, twist, or track poorly.
Always adjust both sides equally, in ½-turn increments.
❌ Forgetting to re-engage the pawl knob after tensioning
After winding and tensioning the springs, the pawl knob must be flipped back into the DOWN (engaged) position.
If the pawl knob is left disengaged:
- The built-in Anti-drop safety device is bypassed
- The door could free-fall if a spring breaks in the future, causing severe injury
This is a critical safety step. The only time the pawl knob should be in the up position is during servicing.
👉 Once spring tensioning is complete, always flip the pawl knob back down to re-engage the ratchet before moving on.
For some additional safety topics, see DASMA Safety Tips for Garage Doors.
TorqueMaster Plus Spring Installation FAQs
If you’re installing TorqueMaster Plus springs and have a quick question, you’re not alone. These FAQs cover the most common issues homeowners run into during a TorqueMaster Plus spring installation and how to fix them.
Yes. It is normal for replacement TorqueMaster Plus springs to be a different length than the originals.
Spring length can vary due to updated torque ratings and design changes. As long as the springs are correctly matched to the door height and weight, the difference in length will not affect performance.
Newer TorqueMaster Plus springs often use nylon or composite materials instead of aluminum for stationary cones and winding components.
These updated materials are intentional and designed to reduce friction, resist corrosion, and improve long-term durability compared to older designs.
Yes. In most cases, the plastic liners from the original TorqueMaster springs should be reused during installation. These liners reduce friction inside the torque tube, prevent metal-on-metal wear, and help the springs wind evenly.
Only replace the liners if they are cracked, brittle, or otherwise damaged.
No. TorqueMaster Plus springs are pre-lubricated from the factory and do not require additional lubrication.
However, other garage door components still need regular lubrication, including the cable drum end bearings, door hinges and rollers, and the opener chain or rail. Lubricating these parts helps the door operate smoothly, quietly, and with less strain on the opener.
The number of turns depends on the height of the garage door.
Most standard 7-foot doors require 16 turns per spring, while taller or shorter doors will require a different amount. Always tension both sides equally and make adjustments in small increments.
Over-tensioning causes the garage door to rise on its own and places unnecessary strain on the opener and hardware.
If the door lifts without assistance during the balance test, reduce spring tension slightly and retest until the door stays in place when released.
If the door is not level after installation, the springs must be fully unwound before making adjustments.
An uneven door is usually caused by unequal cable tension or one spring being wound more than the other. After releasing tension, adjust the door cables and retention springs so both sides are seated evenly, then re-tension both springs equally. Once corrected, the door should sit level at the floor and move smoothly.
Yes. TorqueMaster Plus spring installation is DIY-friendly for careful, capable homeowners.
The enclosed spring design is safer than exposed torsion springs, and the controlled winding system allows for precise tensioning when each step is followed correctly.
TorqueMaster Plus Spring Installation: Final Takeaway
Replacing and tensioning TorqueMaster Plus springs isn’t complicated—but it does demand patience, attention to detail, and respect for the system. If you follow each step carefully, double-check your orientation and tension counts, and never rush the process, this repair is well within reach for a capable DIY homeowner.
Take your time, work methodically, and don’t be afraid to pause and recheck your work. A properly installed TorqueMaster Plus system should open smoothly, stay balanced, and operate quietly for years to come.
👉 If you haven’t already, start with Part 1: Diagnosing & Removing Wayne Dalton TorqueMaster Springs to make sure you’ve got the correct springs and prep work completed.
🔧 More real-world DIY repairs coming soon.
God bless,
Brant
💬 If you have a question, ran into an issue, or successfully completed the repair, leave a comment below — I read every one.
Affiliate disclosure: If you purchase anything from Amazon using links in this post, I may earn a small commission at no extra cost to you. That support helps my family and keeps this site going, and I truly appreciate it.
Leave a Reply