By Brant — DIY Car Guy
⏱ Moderate read: ~10 minutes · 🎥 Or watch the step-by-step video below.
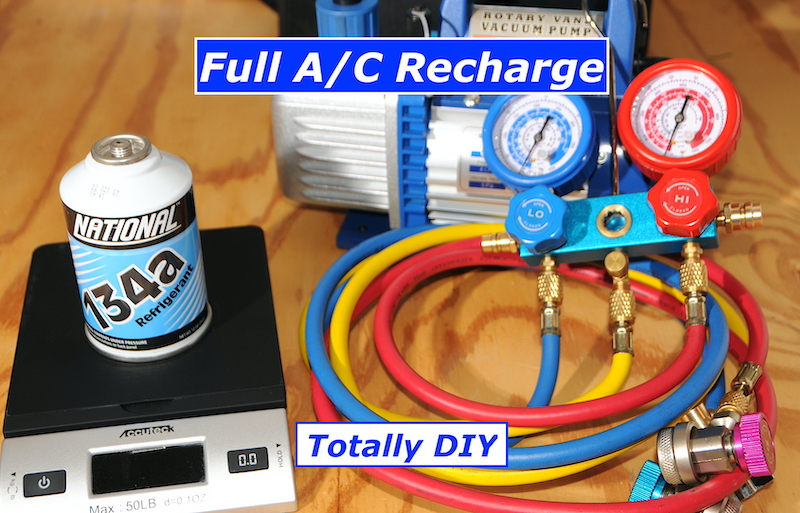
Your car’s AC isn’t blowing cold anymore. You’ve already tried a quick top-off and it helped for a little while, but now the air is warm again. When a simple top-off no longer works, it’s time for a DIY car AC full recharge — the complete process that removes all old refrigerant, air, and moisture, then adds the exact factory-spec amount of R-134a by weight using manifold gauges and a vacuum pump.
It’s totally doable at home with a manifold gauge set and vacuum pump. Here’s exactly how to do it, step by step.
🎥 Watch the video if you’d like to see me demonstrate process in real time:
Tools and Materials You’ll Need
- Manifold gauge set with Vacuum pump (R-134a specific)
- Safety glasses and nitrile gloves
- Digital scale [Amazon affiliate links]
- Fresh R-134a cans (straight refrigerant—no leak stop or additives) [Advance Auto Parts affiliate link]
Safety First
Refrigerant can cause instant frostbite, so always wear safety glasses and gloves. Work in a well-ventilated area, never attach hoses while the engine is running (connect everything first, then start the engine), and keep fingers and hoses from spinning belts and cooling fans.
Be environmentally responsible
Never vent refrigerant into the atmosphere. If your system still has any pressure, take the car to a shop for proper recovery first. Many shops do this for free because they can reuse the refrigerant.
🔎 Quick tip: With the engine off, quickly press one of the AC port Schrader valves with a pocket screwdriver. If you see or hear a spurt, the system still contains refrigerant and must be professionally recovered before you continue.
Why a DIY Car AC Full Recharge Needs a Deep Vacuum
Air and moisture left in your AC system will start to rust the system from the inside out, eventually destroying the compressor. A proper vacuum removes both, so your new refrigerant works exactly as designed.
Here’s the exact sequence I follow every time:
Step 1: Connect the Manifold Gauges and Vacuum Pump
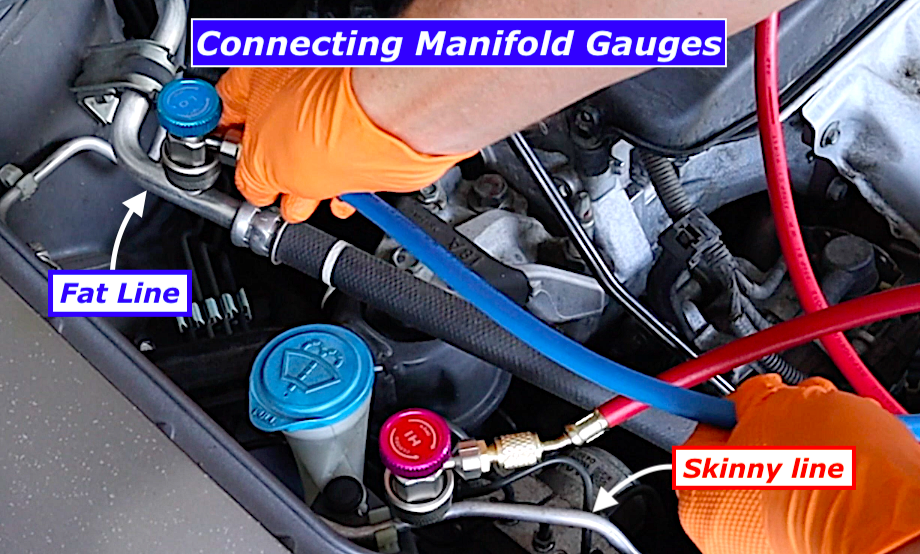
Remove the caps on the AC ports and make sure the o-rings came off with them.
Hook the blue hose to the low-side AC service port and the red hose to the high-side port. Run both valves down (clockwise), pressing the Schrader valves down in these ports. This allows the gauges to “see” what’s in the system.
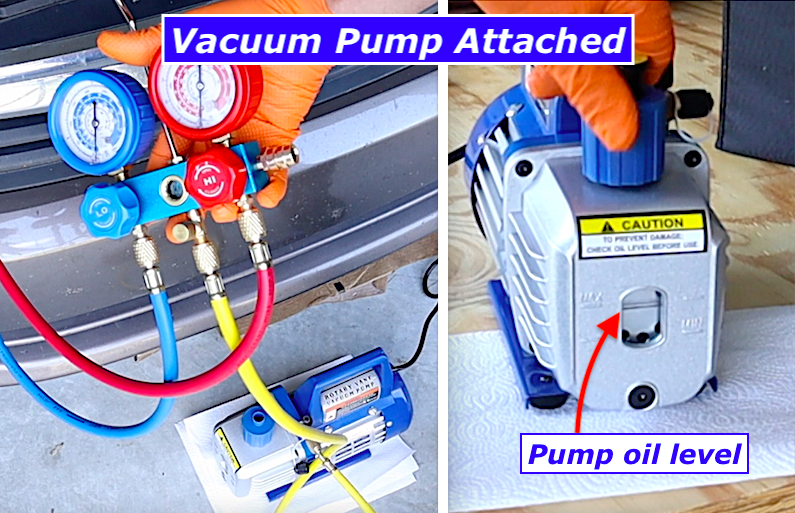
Connect the yellow hose to the vacuum pump. Turn the pump on after checking the oil in pump. Then open both manifold valves.
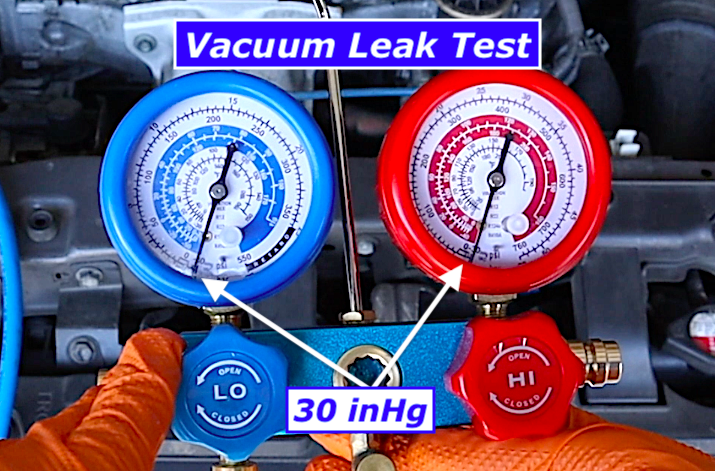
Step 2: Initial Vacuum Pull and Leak Test
Run the vacuum pump for 15 minutes. The gauges should reach 29–30 inHg. Close the valves, turn off the pump, and wait 45 minutes. If the needles hold steady, you’re leak-free.
If you’re losing vacuum, double check your connections on your manifold gauge set and re-do the test.
Step 3: Deep Vacuum
Now that you know the system has no leaks, it’s time for that deep vacuum. Turn your pump back on, open your manifold valves, and walk away for a full 60 minutes. This is what separates a permanent job from a temporary fix in a DIY car AC full recharge.
When complete, close the valves and turn off the pump.
Step 4: Precision Charging by Weight

Check the factory spec sticker under your hood for the exact amount of R-134a required.
🔎 Tip: R-134a refrigerant is the most common refrigerant type used in vehicles 1996 – 2021.
PAG Oil Note:
If this is the very first full recharge on your system, skip the oil — not necessary. The small amount of oil that came out when you had your refrigerant reclaimed is negligible. Otherwise add 1 oz of PAG 46 oil into the yellow charging hose with a syringe or dropper before connecting your first can of R-134a.
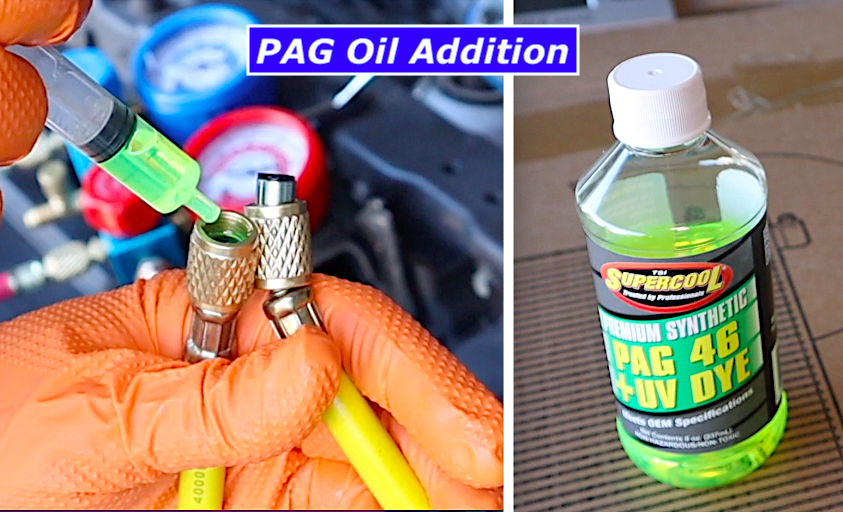
Attach the valve on top of the first can of refrigerant, making sure that the valve is run out 100% counterclockwise beforehand.
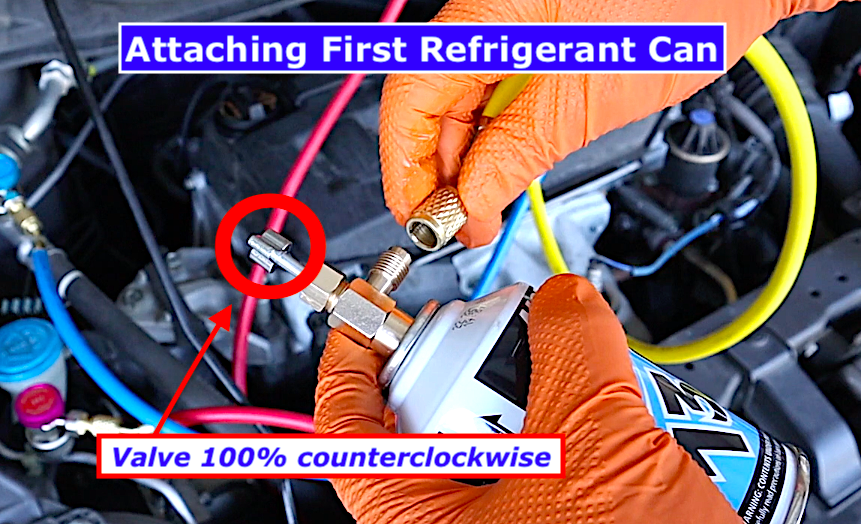
Remove the yellow line from the vacuum pump and connect it to male threads on the valve that you just attached to your can.
Once you have the hose attached to your can of refrigerant, turn the valve clockwise to puncture the can, then turn the valve counterclockwise again a few turns (50% or so) to allow the contents of the can to flow up the hose.
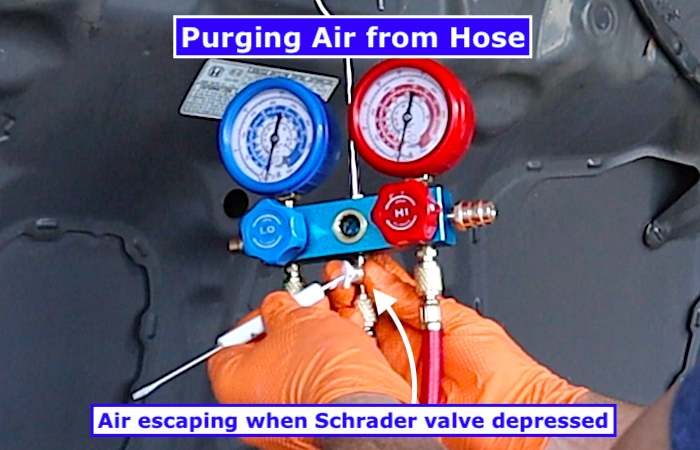
Now, purge the yellow hose to remove any air before charging so you don’t push any air back into your freshly vacuumed system.
Adding the Refrigerant
Double check to make sure nothing is in the way of the engine’s drive belt, then start your car and turn the A/C on Max (recirculation).
🔎 Tip: Place a fan in front of your car aimed at the radiator/condenser.
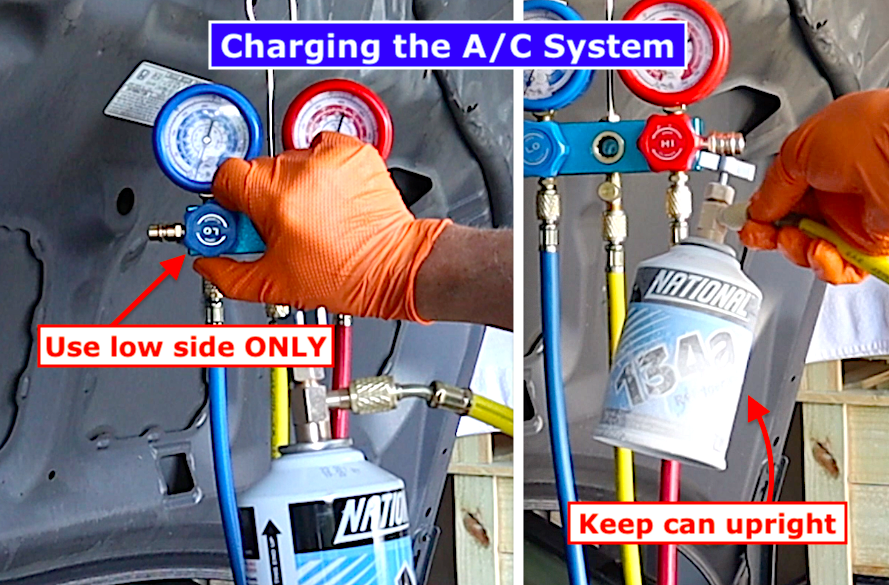
With the refrigerant can upright, open the low side manifold valve ONLY. You’ll hear the compressor click on, and feel the can getting ice cold.
As the can empties, you’ll notice that speed of which the refrigerant comes out slows, and that’s normal. It’s okay to “dip” the can horizontal briefly while shaking it at this point.
🔎 Tip: If you notice that no more refrigerant seems to be coming out at all, twist the valve on top of the can back and forth as sometimes it’ll freeze up during the process.
Now to switch cans:
- Close the low side valve on the manifold.
- Turn the valve that’s attached to the now empty can 100% clockwise
- Remove the empty can
- Spin on the new can
Note that when you attach your new can of refrigerant, the can this time will be pierced as it’s being tightened down. That’s okay, just tighten it down quickly.
Once done, then turn your valve (that’s now secured to your new can of refrigerant) counterclockwise roughly 50%.
Now for the part that confuses some DIYers, but follow along:
In my video I added exactly 3 oz from the second can to match my vehicle’s requirement of 15 oz total (12 oz from first can + 3 more ounces = 15 oz).
You can model after me.
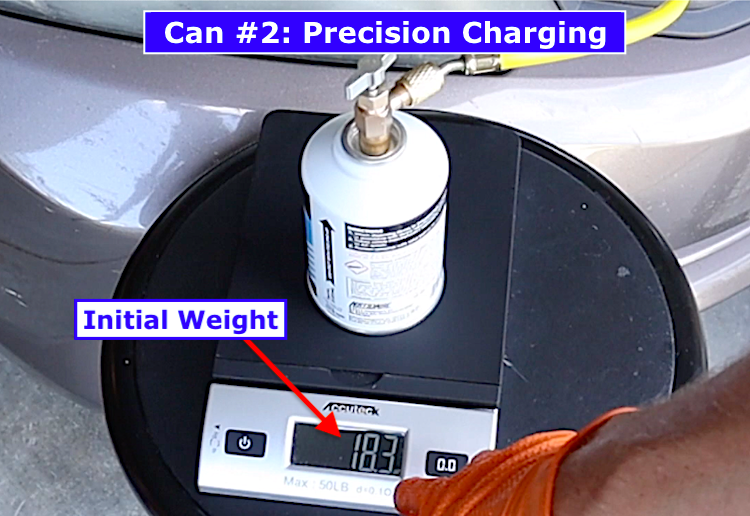
Place your second can on the digital scale and note the reading. This measurement (18.3 oz in my case) is the weight of the contents of the can (the 12 oz of refrigerant) plus the weight of the can itself and the hose attached to it.
Now do some quick math:
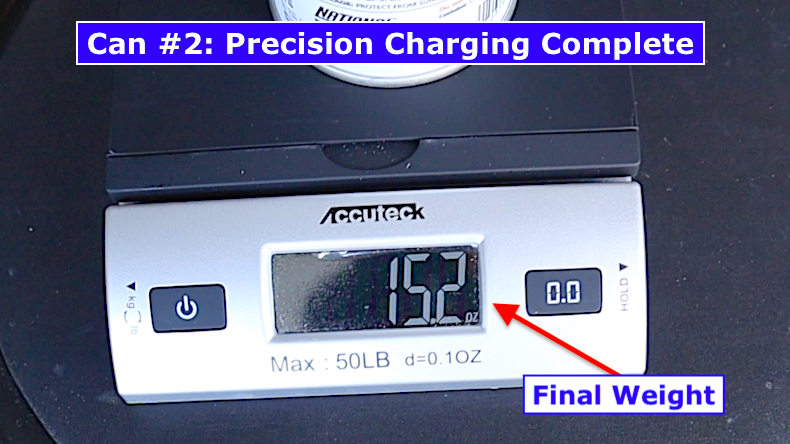
If you need 3 ounces out of this second can like I did, you know that the final reading on the scale should read as close as you can get to 15.3 oz when finished.
[Initial weight – Ounces needed from can #2 = Final weight]
Once you know your final weight, simply re-open the low side manifold valve SLOWLY while watching the scale. When the desired amount of refrigerant has been added, close the valve.
You’re done.
Now turn the valve on top of your can 100% clockwise then open your low side manifold valve one more time to pull the remaining refrigerant out of the yellow hose.
Now you can detach your can. (Today’s refrigerant cans are self sealing, meaning when you remove the valve assembly the contents will not leak out.)
🥳 Congrats: You now have correctly charged your AC system with the proper amount of refrigerant.
Step 5: Post-Charge Diagnostics After Your DIY Car AC Full Recharge
Now that you’ve completed your DIY car AC full recharge, the manifold gauges become your best diagnostic tool.
If you watched the video, you know my job wasn’t finished at when I completed the vacuuming and full recharge process. I had other issues.
I won’t spoil it for you, you’ll have to go watch at time stamp 16:16.
But what I want to emphasize to you is this:
There’s valuable information in your pressure readings now that you’re certain you have the proper AC charge in your car.
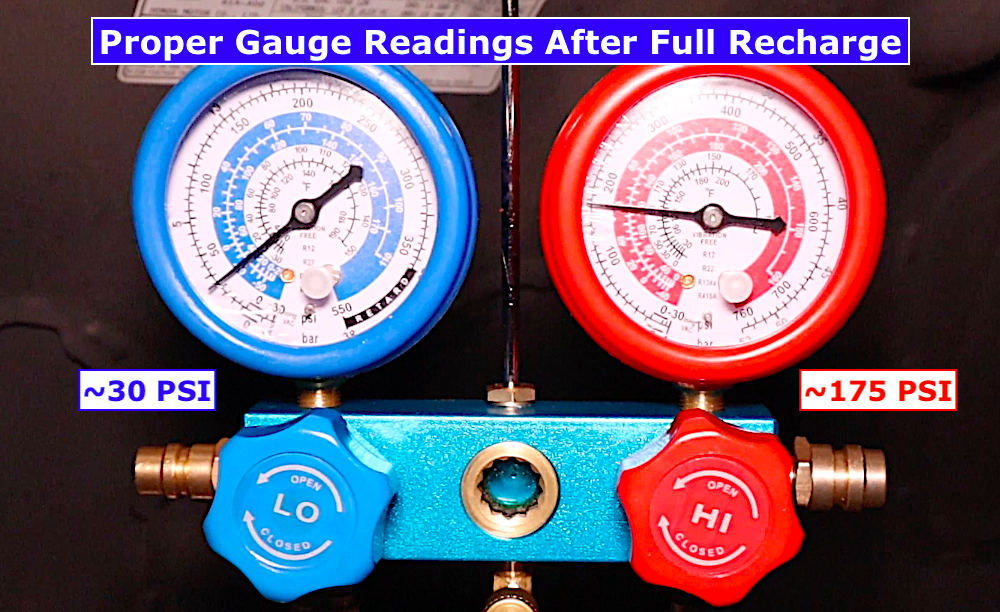
Start the engine, set AC to max cold, and watch the gauges. Proper readings (at 80 °F ambient) are roughly 25–32 psi low side and 175–210 psi high side, depending on your vehicle.
| Ambient Temp (°F) | Low Side (PSI) | High Side (PSI) |
| 70°F (21°C) | 20 – 28 PSI | 130 – 170 PSI |
| 75°F (24°C) | 22 – 30 PSI | 150 – 185 PSI |
| 80°F (27°C) | 25 – 32 PSI | 175 – 210 PSI |
| 85°F (29°C) | 26 – 33 PSI | 190 – 225 PSI |
| 90°F (32°C) | 28 – 35 PSI | 210 – 250 PSI |
| 95°F (35°C) | 30 – 38 PSI | 230 – 275 PSI |
This table is specific to a Honda Civic (9th gen) and reflects when the engine is at approx. 1500 rpm and the compressor is cycled on. But these numbers are a good benchmark regardless of what type of vehicle you’re working on.
A couple of things that’ll make your readings higher:
- If you’re in a humid climate, or
- You’re at a higher elevation
Also, note that your readings will be a little higher if you are working on an older vehicle because those systems use an orifice tube instead a thermal expansion valve.
❄️ Example: A 2005 Silverado on an 80°F day with engine held at 1,500 RPM — Low side will usually stay up around 32 PSI while the high side might see upwards of 235 PSI.
The priceless conclusion:
Once you know that your AC system has been evacuated, has had a deep vacuum pulled on it, and now has a perfect charge, your manifold gauge set will tell you for certain whether your system is working like it should.
When done:
- Turn your engine off
- Turn the valves on the ends of your red and blue lines — that’s connected to your service ports — counterclockwise all the way, then remove them
- And don’t forget to replace your caps onto your service ports
See below in the FAQ section for a few extra details concerning abnormal gauge readings and possible reasoning behind it.
⚠️ Common DIY Mistakes to Avoid
Here are the mistakes I see most often that waste time, money, or damage the system:
❌ Assuming the system is completely empty
Always “blip” the Schrader valves first and have any remaining refrigerant professionally recovered. (see this EPA guide on handling automotive refrigerants for why that’s required).
❌ Skipping or shortening the deep vacuum
The 60 minutes vacuum time is non-negotiable; moisture left behind will acidify and destroy your compressor.
❌ Adding refrigerant without precision weighing
Eyeballing it is the #1 reason systems are over- or under-charged.
❌ Using refrigerant with leak-stop or other additives
This can clog the expansion valve or orifice tube.
❌ Forgetting to purge the yellow hose
Even a tiny bubble of air ruins the vacuum you just spent an hour pulling.
❌ Opening the high-side valve while charging
While certain professional setups allow for charging via both high and low sides of the system, the safest way for the DIYer is to charge only thru the low side. The only disadvantage is that it takes a few minutes longer to do so.
Frequently Asked Questions
Run the vacuum pump for 15 minutes (initial pull + leak test), then a full 60 minutes for the deep vacuum. This removes all air and moisture.
No. When the system is empty, without a deep vacuum you’re trapping air and moisture that will destroy the compressor and make the AC stop working again in weeks.
Only if you’ve had a major leak or replaced a component. For a first-time full recharge on an otherwise untouched system, the factory oil is still sufficient.
With the engine off, quickly press one of the Schrader valves with a screwdriver. If you hear or see a spurt, the system still has refrigerant and must be professionally recovered. Then it’s ready for the DIYer to vacuum and recharge.
At 80 °F ambient and engine at 1,500 rpm: low side 25–32 psi, high side 175–210 psi. Exact numbers vary slightly by vehicle, relative humidity, and elevation.
Your gauges will tell you. For example, if the low side stays in vacuum, you likely have a restriction (expansion valve, orifice tube, or clogged evaporator). If, with the compressor running, the high and low side are very close together (e.g. both read 80psi), that means you have a failed compressor.
Typically $30-40 for two cans of R-134a plus the one-time cost of the manifold set and vacuum pump (approx. $150). Much cheaper than a shop and you keep the tools.
DIY Car A/C Full Recharge, Final Thoughts
This whole process takes about 2 hours, costs less than what a shop would charge, and now you have the tools at your disposal any time you need them. It’s totally DIY, and you’ll be surprised how simple it really is.
❓Quick question for you: Did your cans of refrigerant go in easily or did it longer than you expected? Drop a comment — your experience helps the next DIYer.
Enjoy that cold air!
God bless,
Brant
A quick note on the links in this post: If you buy anything through the Amazon or Advance Auto Parts links above, I earn a small commission at no extra cost to you. It helps support the honest, no-fluff DIY content I create here on honestbrant.com. Thank you!
One last thing: Please be safe when working on your vehicle. Do so at your own risk. I’m not a professional mechanic, just a regular guy. I’m simply demonstrating how I work on my own car. Thanks again for your support!
Ready to read another post? Watch me do an honest review on AT-205 to help solve a rear main oil leak. Find it here.
Leave a Reply