
By Brant — DIY Car Guy
⏱ Quick read: ~5 minutes
This 2012 Honda Civic transmission filter replacement guide covers the external inline filter on 2012–2015 (9th generation) models. Yes, these Civics do have a replaceable automatic transmission filter. It’s located under the airbox — not buried inside the pan like most cars. A lot of people (and some mechanics) don’t realize it’s there.
This is a straightforward DIY job with basic hand tools. You can do the 2012 Honda Civic transmission filter replacement by itself or at the same time as a fluid change.
🎥 Watch the full step-by-step video:
Tools & Parts You’ll Need for 2012 Honda Civic Transmission Filter Replacement
- OEM Honda ATF Filter (part 25430-PLR-003) [Amazon affiliate links]
- Safety glasses (these have splash protection)
- Mechanics gloves
🛠 Additional Parts/Tools you may need:
- Honda DW-1 ATF (if you’re doing a full fluid service at the same time)
- Air intake hose
- Socket set
- Long screwdriver
- Headlamp (makes life so much easier)
- Regular pliers
- Vice Grip pliers
- Inspection mirror
- Mechanics magnet
- WD-40
Step 1: Remove the Airbox
Disconnect the MAF sensor connector first so you don’t damage it. Remove the airbox cover and filter if you want more room, then unbolt the airbox (a couple of 10 mm bolts). Lift it out of the way. The transmission filter sits right underneath.
Tip: After the bolts are out, the airbox can still be stuck on the rear peg. It usually just needs a firm lift or a little wiggle to pop free. Watch the timestamp at 03:14 in the video to see exactly how I get it off.
Step 2: Remove the Old Filter
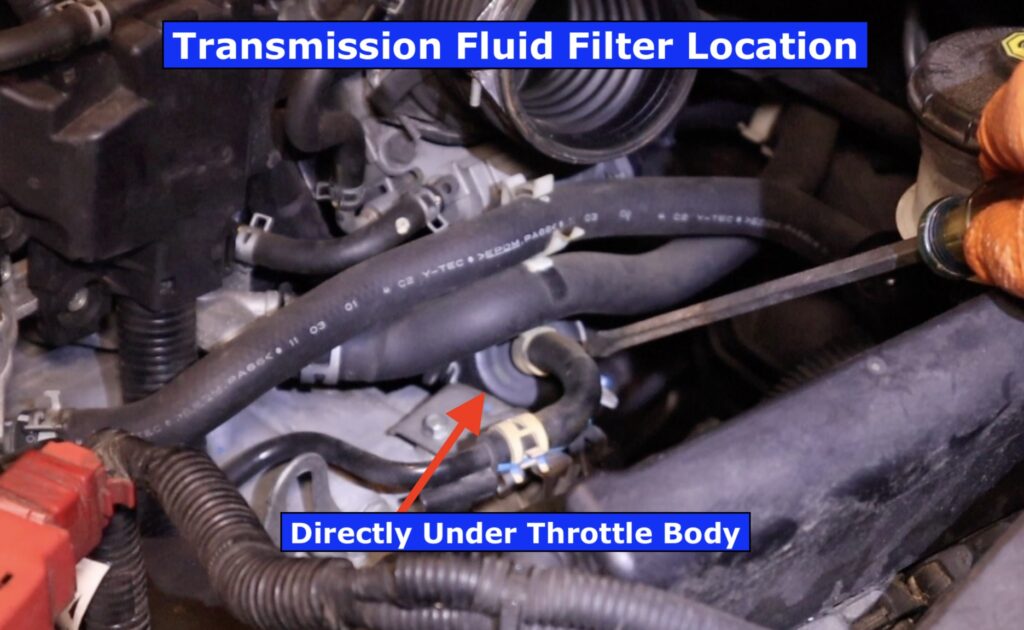
The filter is held by a small support bracket (10 mm bolt) and two hoses with spring clamps. Slide the clamps back, then work the hoses off both ends. A little WD-40 on the outside of the hose plus some twisting usually breaks them free. Some people remove both hoses completely for extra room — that works well too.
Very little fluid comes out — just residual fluid in the lines and the filter itself. Shove a rag underneath the connections to avoid any mess and you’re good.
Step 3: Install the New Filter
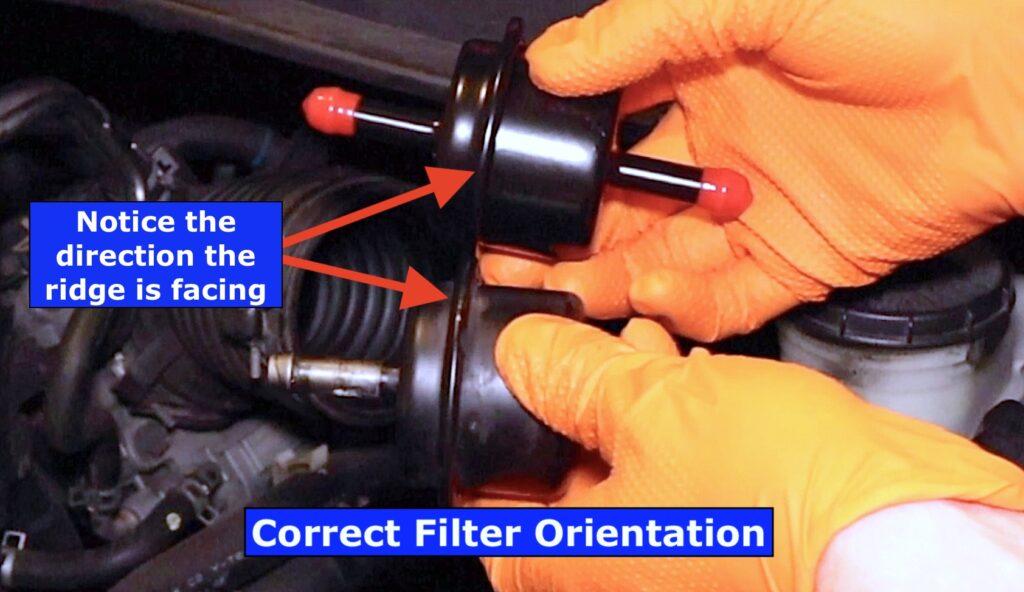
Slide the hoses onto the new filter in the same orientation as the old one. Position the clamps and reinstall the support bracket. Snug the bracket bolt so the filter doesn’t move — it doesn’t need to be torqued hard.
Tip: Using a pair of vice-grip pliers on the clamp on that lower hose makes installation a breeze. See timestamp 6:45 in the video to see how I position the pliers in just the right way when removing the old filter so it’ll be right ready for you when you install the new one.
Step 4: Reinstall Everything
Put the airbox back in place, reconnect the MAF sensor, and make sure the intake hose is fully seated. While you’re in there, check the air intake hose for cracks — they’re common on these and can cause drivability issues.
Bonus content: I did a completely separate video where I replaced my air intake hose if you’re interested.
Start the car and check for leaks. If you didn’t do a full fluid change at the same time, verify the level and top off with Honda DW-1 if needed.
That’s the whole 2012 Honda Civic transmission filter replacement. Basic tools, not much mess, and it increases the life of the transmission.
Final Notes on Service Interval
You don’t need to replace this filter every time you change the fluid. Around every 100,000 miles is a reasonable interval for 2012–2015 models. Fluid changes matter more and should happen more often (most people do those every 30,000–60,000 miles with DW-1).
There is also an internal strainer inside the automatic transmission, but Honda does not treat that as a regular service item. It’s typically only replaced if the transmission is being rebuilt.
For more on why regular transmission service is important, see this overview from Kelley Blue Book.
Frequently Asked Questions
Yes. The 2012–2015 (9th gen) Honda Civic automatic has an external inline transmission filter located under the airbox. It is a replaceable part (OEM number 25430-PLR-003) and is accessible by removing the airbox.
Around every 100,000 miles is a reasonable interval. You do not need to replace it every fluid change. Transmission fluid changes are more important and should be done more frequently.
Very little. Only residual fluid in the lines and the filter itself comes out. Check the level afterward and top off with Honda DW-1 if needed.
Yes. There is an internal strainer inside the transmission. Honda does not list it as a regular service item. It is normally only replaced during a transmission rebuild.
It is possible to reach parts of it from underneath on a lift, but removing the airbox makes the job much easier and cleaner. That is the recommended method.
Sometimes people notice smoother shifts if the old filter was restricted, but it is not a guaranteed fix. Fluid level and condition usually matter more. Check those first.
2012 Honda Civic Transmission Filter Replacement: Final Thoughts
Replacing the external transmission filter on a 2012–2015 Honda Civic is a simple DIY job that most people can knock out in under an hour with basic tools. It’s not something you have to do every fluid change, but doing it around the 100,000-mile mark (or whenever you’re already in there) helps keep the transmission cleaner and happier longer.
If you’ve got a 9th gen Civic and haven’t touched the filter yet, it’s worth considering the next time you’re doing a fluid service.
Have you replaced the transmission filter on your Civic, or are you planning to? Drop a comment below and let me know how it went. I’d love to hear about your experience or any questions you have.
Thanks for reading. God bless.
Brant
Affiliate note: As an Amazon Associate I earn from qualifying purchases. Links above may earn me a small commission at no extra cost to you. Thank you for supporting the site and channel!
Ready to read another post? Watch me do a full real-time review on AT-205. Find it here.
Leave a Reply